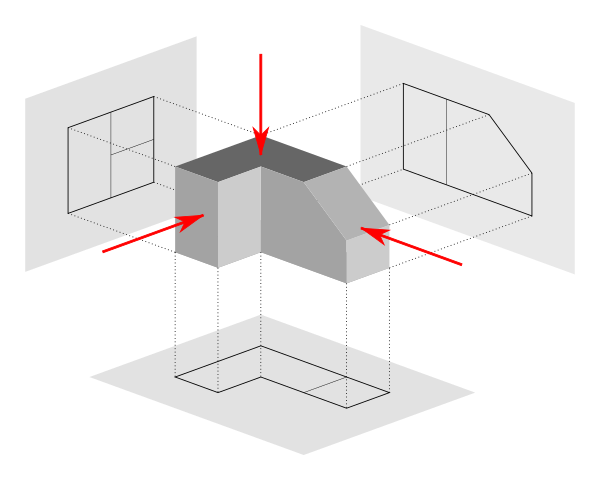
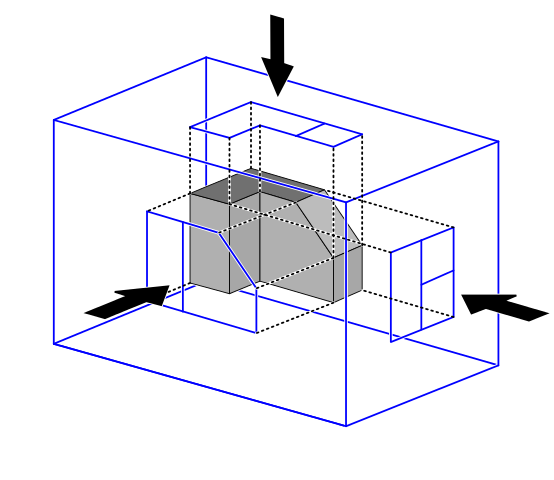
This is one of the most common topics of discussion in the community of mechanical engineers and designers alike. Beginners who are new to the concept of orthographic drawings often get confused about the two and if you’re one of them, you’re not alone. Ask any professional with a hands-on experience of design and tools, he or she will say this is nothing but the means of representing three-dimensional objects in two dimensions. First and third angle projection are nothing but ways of describing what an object looks like from different directions. This is called orthographic projection and orthographic is nothing but engineering drawings or plan views. Now that you understand the concept of orthographic projections, let’s discuss the difference between first and third angle projection.

What is First Angle Projection?
This is one of the most common methods used to obtain engineering drawings, mostly for orthographic projections. Orthographic projection is a graphical method used to represent three-dimensional structures or objects into different perspective projection images called views. The orthographic view typically consists of the top view, front view, and the side view. First angle projection is one of the methods used for orthographic projection drawings and is approved internationally except the United States. In this projection method, the object is placed in the first quadrant and is positioned in front of the vertical plane and above the horizontal plane.

What is Third Angle Projection?
This is another perspective projection method used to represent three-dimensional objects using a series of two-dimensional views. In third angle projection, the 3D object to be projected is placed in the third quadrant and is positioned behind the vertical plane and below the horizontal plane. Unlike in first angle projection where the plane of projection is supposedly opaque, the planes are transparent in third angle projection. This projection method is mainly used in the United States and Japan stipulates the use of third angle projection schema for industrial designs for product fabrication.
Difference between First and Third Angle Projection
Basics of First and Third Angle Projection
First Angle Projection is one of the ways of representing three-dimensional objects with respect to two dimensions which is commonly used in Europe and most of the world except the United States. For getting orthographic views from 3D objects, we divide the plane into four quadrants. The object is placed in the first quadrant for the first angle projection. United States and Australia uses the Third Angle Projection method as their default projection system. The object is placed in the third quadrant for the third angle projection.
Representation of First and Third Angle Projection
Both are schemas used for multiview projection of three-dimensional objects using a series of two-dimensional drawings. The principal planes of an object are used to project different views of the same object from different points of sight. Overall six different sides can be drawn consisting of six orthographic views called as principal views. To get the first angle projection, the object is placed in the first quadrant meaning it’s placed between the plane of projection and the observer. For the third angle projection, the object is placed below and behind the viewing planes meaning the plane of projection is between the observer and the object.
Plane of First and Third Angle Projection
Both methods of orthographic projection result in the same six principal views of the object except the arrangement of views and the state of plane of projection. In the first angle projection schema, the plane of projection is believed to be opaque or non-transparent. The object is placed in front of the planes and each view is pushed through the object which places the vertical plane behind the object and pushes the horizontal plane underneath. In the third angle projection method, the plane of projection is transparent and the object is placed below the horizontal plane and behind the vertical plane.
View Sequence of First and Third Angle Projection
In the first angle projection method, the orthographic view is projected on a plane located beyond the object and the observer is on the left side of the object and projects the side view on a plane beyond the object. The right side view is projected to the left of the front view and the top view is projected onto the bottom of the front view. In third angle projection, the observer is on the right side of the object and the orthographic view is projected on a plane located between the view point and the object. The right view is projected onto the right side of the front view and the top view is projected above the front view.
First vs. Third Angle Projection: Comparison Chart

Summary of First vs Third Angle Projection
Both first angle and third angle projection are the two ways of drawing in orthographic that usually consists of three different views of an object in two dimensions. They are used to obtain engineering drawings for clarity. For the first angle projection the observer is placed on the left side of the object which puts the object right between the plane of projection and the observer. For the third angle projection, the observer is located on the right side of the object which puts the plane of projection exactly between the object and the observer. Although both are graphical methods used in engineering drawings, they differ in the way they position their views.
- Difference Between Pokémon Pearl and Diamond - February 16, 2026
- Difference Between Caucus and Primary - June 18, 2024
- Difference Between PPO and POS - May 30, 2024


This article needs many corrections. A lot of repeats and incomplete information…
e.g “First angle projection is one of the methods used for orthographic projection drawings and is approved internationally except the United States. ”
“This projection method is mainly used in the United States and Japan stipulates the use of third angle projection schema for industrial designs for product fabrication.”
“The object is placed in the first quadrant for the first angle projection. United States and Australia uses the Third Angle Projection method as their default projection system. ”
So… United States, Japan, Australia and Canada (missing in this article) are using Third Angle projections.
Reply
Actual difference between the first Angeles of projection and third Angeles of projection in short form…
Reply
The symbols for 1st and 3rd angle projection are incorrect… the cone is shown in the incorrect orientation. Google it for the correct placement/orientation.
Reply
Absolutely right sir.
Reply
Symbols are wrong
Reply
To lean more aboat orthographic projection
Reply
Thank you very much
Reply
For the direction must sync / same as object? exp cylinder object for the third angel.. round -rectangle.. need same as the part draw looking.
Reply
That was great thank you
Reply